
Humanoid robots use plastics for more than “covers.” Plastics often determine weight, impact survivability, noise/vibration, wire management, sealing, human touch surfaces, and serviceability. The best process depends on three things:
- Part role: cosmetic shell vs structural bracket vs seal vs grip vs cable guide
- Volume and iteration speed: prototype/EVT vs pilot vs production
- Performance needs: impact, stiffness, wear, sweat/chemicals, flammability, ESD, finish
This guide maps the molding processes that show up most in humanoid robotics and how teams typically mix them across development stages.
Where plastics show up on humanoids
Common plastic part families:
- Outer shells / fairings: chest, head, limb covers, shrouds, guards
- Impact & abrasion parts: bumpers, edge guards, toe/heel scuffs
- Human contact parts: grips, padding, touch-safe covers, cosmetic “skin”
- Cable management: clips, grommets, strain reliefs, conduit segments
- Functional internals: sensor mounts, fan ducts, manifolds, connector brackets
- Sealing & isolation: gaskets, boots, bellows, vibration isolators
- Low-noise interfaces: polymer gears (some designs), chain guides, bearing caps
The main molding processes (and when to use them)
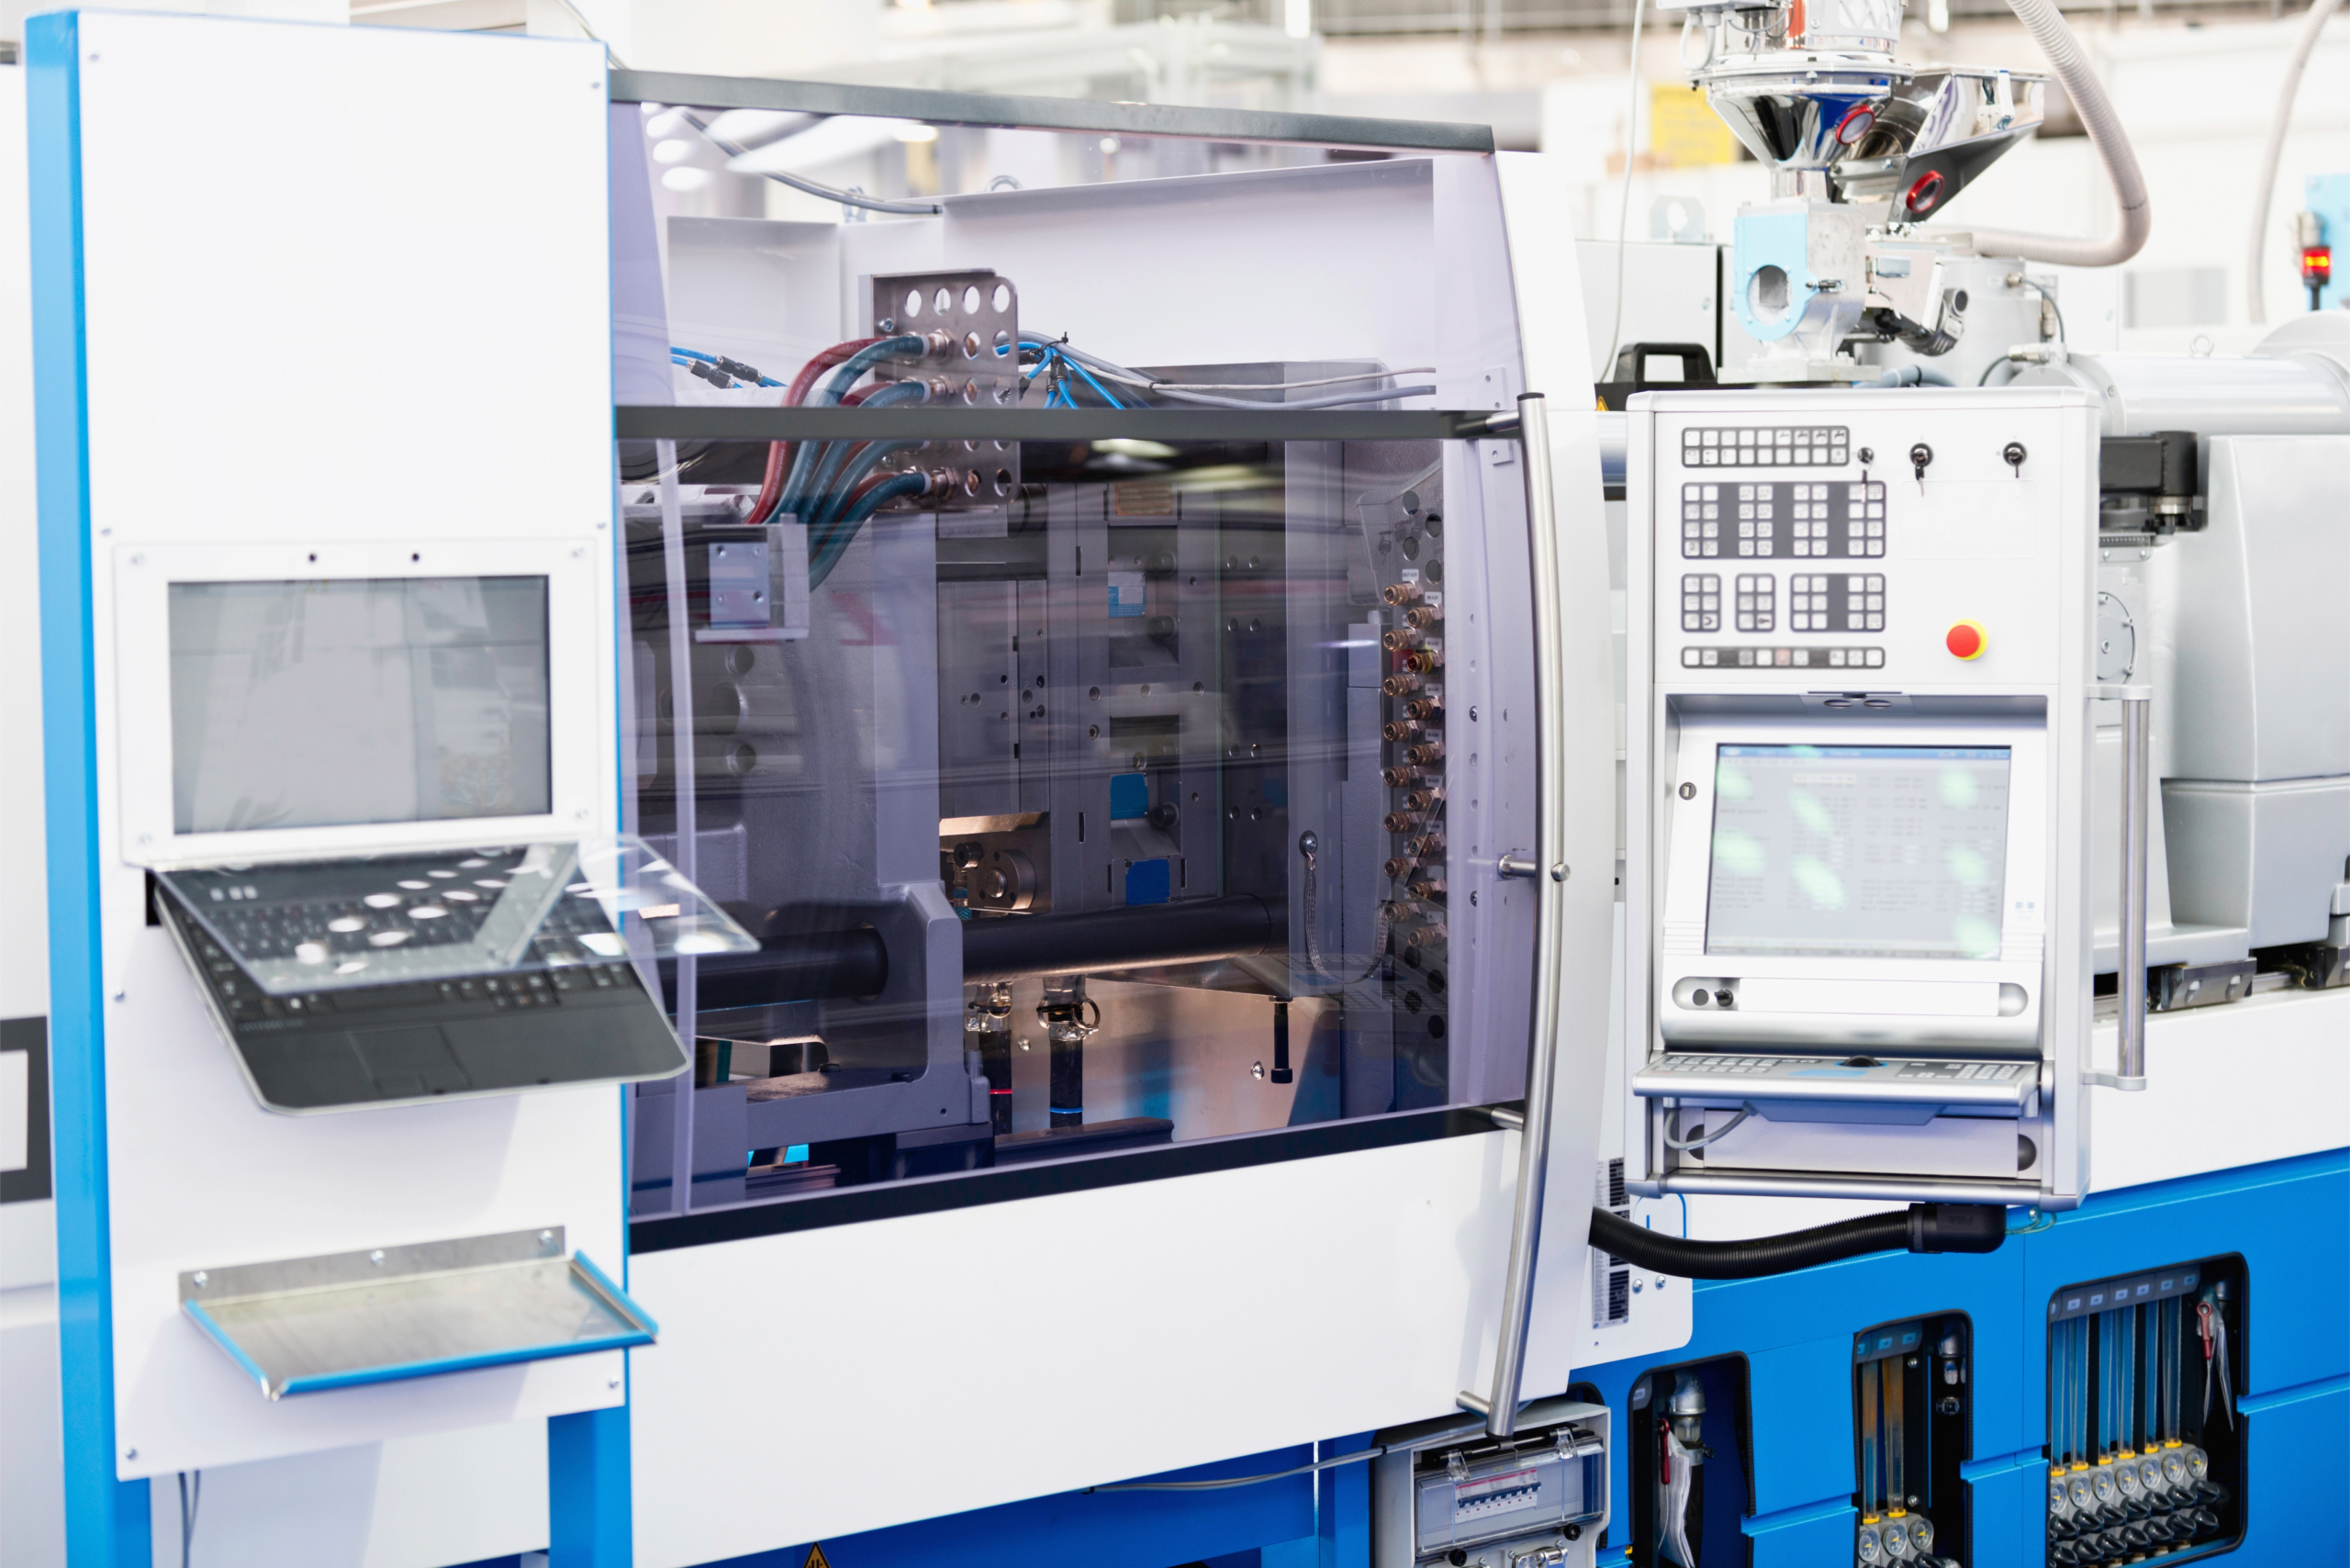
1) Injection molding (thermoplastics)
Best for: most rigid plastic parts at scale—covers, brackets, ducts, clips, bezels
Sweet spot: medium-to-high volume, tight repeatability, great cosmetic control
Why humanoid teams use it
- Lowest piece cost at volume
- Great surface finish control (textures, gloss, paint-ready)
- Supports features that reduce assembly (snap fits, ribs, bosses)
Typical materials
- ABS / PC-ABS: cosmetic housings, moderate impact, easy finishing
- PC: high impact, better heat, tougher shells
- Nylon (PA6/PA66): strong functional parts (watch moisture effects)
- Glass-filled nylon: stiff brackets and mounts (watch warp)
- POM/Acetal: low-friction clips, gears, sliding features
- PBT: connectors, housings with good dimensional stability
- TPU/TPE: soft bumpers, seals, overmold layers
Robotics-specific watchouts
- Fasteners and threads: plan inserts if service cycles are high
- Warp and sink: ribs and bosses must be designed right to avoid cosmetics and fit issues
- Heat near actuators: choose PC, filled nylons, or high-temp resins when needed
Good background reference:
- Injection molding overview: https://en.wikipedia.org/wiki/Injection_moulding
2) Insert molding (metal + plastic in one shot)
Best for: parts that need strong threads, grounding points, or rigid interfaces
Examples:
- brass threaded inserts molded in-place
- steel bushings for pivots
- connector shells with metal retention features
Why it’s great for humanoids
- Improves serviceability (repeated assembly without stripping plastic)
- Enables strong mounting points in thin shells
- Reduces part count and post-assembly operations
Watchouts
- Insert retention needs proper undercuts/knurls
- Thermal expansion mismatch can stress parts if poorly designed
Background reference:
- Insert molding overview: https://en.wikipedia.org/wiki/Insert_molding
3) Overmolding (soft-touch + rigid core)
Best for: human contact surfaces and impact edges
Examples:
- grip zones on handles
- soft bumpers on covers
- sealed interface lips
- anti-rattle pads on clips
Why it matters for humanoids
- Improves perceived quality and safety
- Reduces rattles and noise
- Adds friction where humans interact (better “hand feel”)
Watchouts
- Material compatibility between substrate and overmold is critical
- Bonding may be mechanical, chemical, or both—must be designed intentionally
Background reference:
- Overmolding overview: https://en.wikipedia.org/wiki/Overmolding
4) Reaction Injection Molding (RIM) and polyurethane molding
Best for: large shells, lower tooling cost than injection, good impact energy absorption
Examples:
- torso panels
- large limb shrouds
- protective covers with thick sections
Why teams choose it
- Tooling can be cheaper than thermoplastic injection for big parts
- Good for thicker, tough, impact-resistant shells
- Can support “soft-ish” or semi-rigid parts depending on formulation
Watchouts
- Tolerances and cosmetic control can differ from injection molding
- Paint and surface prep may be part of the normal plan
Background reference:
- RIM overview: https://en.wikipedia.org/wiki/Reaction_injection_molding
5) Compression molding (rubber/silicone, composites)
Best for: gaskets, boots, bellows, vibration isolators, some composite panels
Examples:
- silicone gasket frames
- elastomer pads for vibration control
- molded rubber feet/toe pads
Why it’s common in humanoids
- Seals and boots are everywhere (dust, sweat, outdoor use)
- Great for durable elastomers in tough environments
Watchouts
- Design must account for flash, parting lines, and post-trim
- Tight tolerance sealing features may need controlled tooling and inspection
Background reference:
- Compression molding overview: https://en.wikipedia.org/wiki/Compression_molding
6) Thermoforming / vacuum forming (sheet forming)
Best for: big cosmetic covers at low-to-mid volume
Examples:
- large shrouds and panels where thickness is modest
- quick-turn cosmetic shells in early builds
Why it’s attractive
- Lower tooling cost, faster to iterate
- Works well for large surface-area covers
Limitations
- Less feature detail than injection
- Trim and cutouts require secondary ops
- Stiffness often needs ribs or bonded sub-structures
Background reference:
- Thermoforming overview: https://en.wikipedia.org/wiki/Thermoforming
7) Urethane casting (vacuum casting) for prototyping
Best for: prototype shells and low-volume parts that mimic injection molded plastics
Examples:
- EVT covers, bezels, cable guides, boots (depending on resin)
- quick aesthetic samples
Why it’s used
- Faster than hard tooling
- Good cosmetics for demos
- Can simulate ABS/PC-like behavior (not perfect, but close enough early)
Watchouts
- Material properties differ from production thermoplastics
- Long-term creep/aging may not match final parts
- Best for fit/finish and pilot testing—not final validation
Background reference:
- Vacuum casting overview: https://en.wikipedia.org/wiki/Vacuum_casting
How humanoid teams typically choose a process
Choose injection molding when…
- You’re past heavy iteration and need repeatable production
- You need controlled cosmetics and consistent assembly fit
- Your part has lots of functional detail (clips, ribs, bosses)
Choose overmolding when…
- Humans touch it (grips, guards)
- You need noise reduction or anti-rattle features
- You need integrated sealing lips or friction surfaces
Choose insert molding when…
- You need repeatable service cycles (threads that won’t strip)
- You want stronger mounting points in thin walls
- You need consistent grounding / metal interfaces
Choose RIM when…
- The part is large and injection tooling is too expensive early
- You want high impact energy absorption
- You can accept different tolerance/cosmetic strategy (often paint)
Choose compression molding when…
- It’s a seal, boot, gasket, pad, or isolator
- Elastomer durability matters more than tight geometry detail
Choose thermoforming when…
- You need large covers fast with lower tooling
- The part is mostly cosmetic and can be trimmed post-form
Choose urethane casting when…
- You’re in EVT and need quick “looks-like-production” parts
- You need low quantities without committing to steel tools
Humanoid-specific requirements that change plastic decisions
1) Noise and vibration
Plastics can squeak, rattle, and buzz. Design for:
- damping layers (overmold pads, TPE bump stops)
- controlled clearances and hard stops
- felt/foam/TPU interface strips where needed
2) Sweat, oils, grease, cleaners
Humanoids encounter:
- sweat and skin oils
- gear grease
- cleaning chemicals
Pick materials and finishes accordingly (and test with your actual chemicals).
3) ESD and electronics proximity
If shells sit near sensitive boards:
- consider ESD-safe grades or coatings
- define grounding strategy (don’t accidentally ground through bearings)
ESD reference:
4) Flammability and safety requirements
If you need flammability ratings (common near batteries/motors):
- specify the requirement early (e.g., UL 94 class) and verify availability in your chosen resin.
UL 94 background:
5) Outdoor exposure (UV, temperature swings)
If outdoor use matters:
- UV-stabilized materials
- paint/coatings
- avoid plastics that embrittle without stabilization
UV degradation background:
DFM tips that matter a lot for humanoid plastics
Injection molding DFM
- Use consistent wall thickness to reduce sink/warp
- Add ribs for stiffness instead of thick walls
- Avoid long unsupported flat spans (they oil-can and buzz)
- Plan for draft angles and parting lines early
- Don’t rely on molded threads if you expect repeated service—use inserts
Overmolding DFM
- Add mechanical retention features (undercuts, holes, knurls)
- Keep the overmold thickness consistent to prevent peel edges
- Specify texture and hardness (Shore A) for grip parts
Insert molding DFM
- Choose insert geometry designed for molding (knurled/undercut)
- Make sure inserts are fully captured and won’t rotate
- Control insert placement tolerances (fixturing and automation plan)
Large shell DFM (RIM/thermoformed)
- Plan mounting strategy that allows for tolerance and thermal expansion
- Use compliant mounts where needed to prevent cracking
- Prefer larger radii at corners to avoid stress concentration
Typical “process + material” pairings in humanoid robots
- Cosmetic covers: Injection molded PC-ABS or PC; textured; optional paint
- Large shells (early scale): RIM polyurethane + paint
- Clips & cable guides: Injection molded POM or nylon; consider glass-fill for stiffness
- Joint shrouds near heat: PC, PBT, or high-temp nylons depending on temperatures
- Soft bumpers & edge guards: TPU/TPE overmold or separate compression-molded parts
- Seals/boots/bellows: Compression molded silicone or elastomer
- Serviceable mounting points: Insert molded brass inserts or heat-staked inserts post-mold
RFQ checklist for molded plastics
When quoting a plastic part for a humanoid robot, specify:
- Process: injection / overmold / insert / RIM / compression / thermoform
- Material + grade: include color, glass-fill %, UV/ESD/FR requirements
- Finish: texture, gloss, paint, dye, cosmetic class, A-surface definition
- Quantity: prototype + annual volume targets
- Assembly: inserts required, fastener torque targets, service cycle expectations
- Environment: sweat/oils/cleaners, UV exposure, temperature range
- Critical dimensions: datum scheme, fit interfaces, allowable warp
- Validation needs: drop/impact, chemical exposure tests, thermal cycling plan
Outbound references
Injection molding: https://en.wikipedia.org/wiki/Injection_moulding
Insert molding: https://en.wikipedia.org/wiki/Insert_molding
Overmolding: https://en.wikipedia.org/wiki/Overmolding
Reaction injection molding (RIM): https://en.wikipedia.org/wiki/Reaction_injection_molding
Compression molding: https://en.wikipedia.org/wiki/Compression_molding
Thermoforming: https://en.wikipedia.org/wiki/Thermoforming
Vacuum casting: https://en.wikipedia.org/wiki/Vacuum_casting
Electrostatic discharge (ESD): https://en.wikipedia.org/wiki/Electrostatic_discharge
UL 94 flammability rating: https://en.wikipedia.org/wiki/UL_94
Photodegradation / UV degradation: https://en.wikipedia.org/wiki/Photodegradation
Takeaways
- Humanoids usually mix processes: urethane cast or thermoform early, injection mold later, and use overmolding/insert molding where humans interact and where serviceability matters.
- For robot reliability, plastics are often about noise control, service cycles, chemical exposure, and fit strategy—not just “looks.”